A Beginner’s Guide to WordPress
Welcome to your first real look at WordPress! This guide is all about WordPress.org, the self-hosted version that’s less like a website builder and more like a powerful, digital toolbox. It gives you the keys to build pretty much any website you can dream up, with total creative freedom and complete control.
We’re going to start from square one, building a solid foundation for your journey online.
Getting to Know Your WordPress Toolkit
Jumping into your first website can feel like a huge step, but WordPress is designed to make it manageable for everyone, no tech skills required. The best way to think about it is like a set of digital building blocks. You can arrange them to create a simple personal blog, a massive online store, a professional business portfolio, and everything in between.
It’s this incredible flexibility that has made it the most popular website builder on the planet.
Why Is WordPress So Popular?
Its massive popularity isn’t just a fluke. WordPress is built on a foundation of accessibility, power, and a huge community. Because it’s “open-source,” thousands of developers from all over the world are constantly working to improve it, keeping it secure and modern. This global, collaborative spirit is what keeps it growing.
The numbers really tell the story. Back in 2011, WordPress powered just 13.1% of all websites. Fast forward a decade, and that number has skyrocketed. Today, among all websites that use a content management system (CMS), WordPress holds a staggering 61.7% market share, leaving competitors like Shopify and Wix far behind.
At its core, WordPress gives you the power to truly own your digital space. You’re not just renting a page on someone else’s platform; you are building your own property on the internet, with full control over how it looks, what it says, and where it goes in the future.
Grasping this idea of ownership is key, and it’s the main reason we’re focusing on the self-hosted version, WordPress.org.
WordPress.org vs. WordPress.com
One of the first things that trips up newcomers is the difference between WordPress.org and WordPress.com. They share a name, but they’re two very different beasts.
It’s a bit like owning a house versus renting an apartment.
- WordPress.org (Owning the House): This is the free software you download and install on your own web hosting. You get unlimited freedom to customize with any theme or plugin you want, and you have complete control over your data and how you make money.
- WordPress.com (Renting an Apartment): This is a for-profit service that handles the hosting for you. It’s an all-in-one package, but it comes with rules. There are restrictions on which themes and plugins you can use, and they have a say in how you can monetize your site.
We believe in the freedom that comes with ownership, which is why this guide is dedicated to the self-hosted path. If you want to dig a little deeper, you can explore the key differences between WordPress.com and WordPress.org in more detail.
Setting Up Your Website’s Home Base
Before you can even think about what your website will look like, you need to secure its place on the internet. Every site, no matter how big or small, needs two things to get started: a domain name and web hosting.
Think of it like building a house. Your web hosting is the plot of land you build on, and your domain name is the street address people use to find you. You can’t start decorating rooms (designing pages) until you’ve laid the foundation on your own piece of digital real estate.
Getting this part right is the first real step in your WordPress journey. Let’s break down what you need to know, minus all the technical jargon.
Choosing Your Web Hosting
Web hosting is essentially a service that stores all of your website’s files—every piece of text, every image, and the WordPress software itself—on a powerful computer called a server. This server makes sure your site is available 24/7 for anyone who wants to visit.
A simple way to think about hosting is to compare it to housing. You could rent a room in a shared house, lease your own apartment, or own a luxury condo with a full-service staff. Each option comes with a different price tag, level of control, and amount of work you have to do yourself.
For most people starting out, there are three main “housing” options for their website. This visual breaks down how they compare in terms of cost and the technical skill you’ll need.
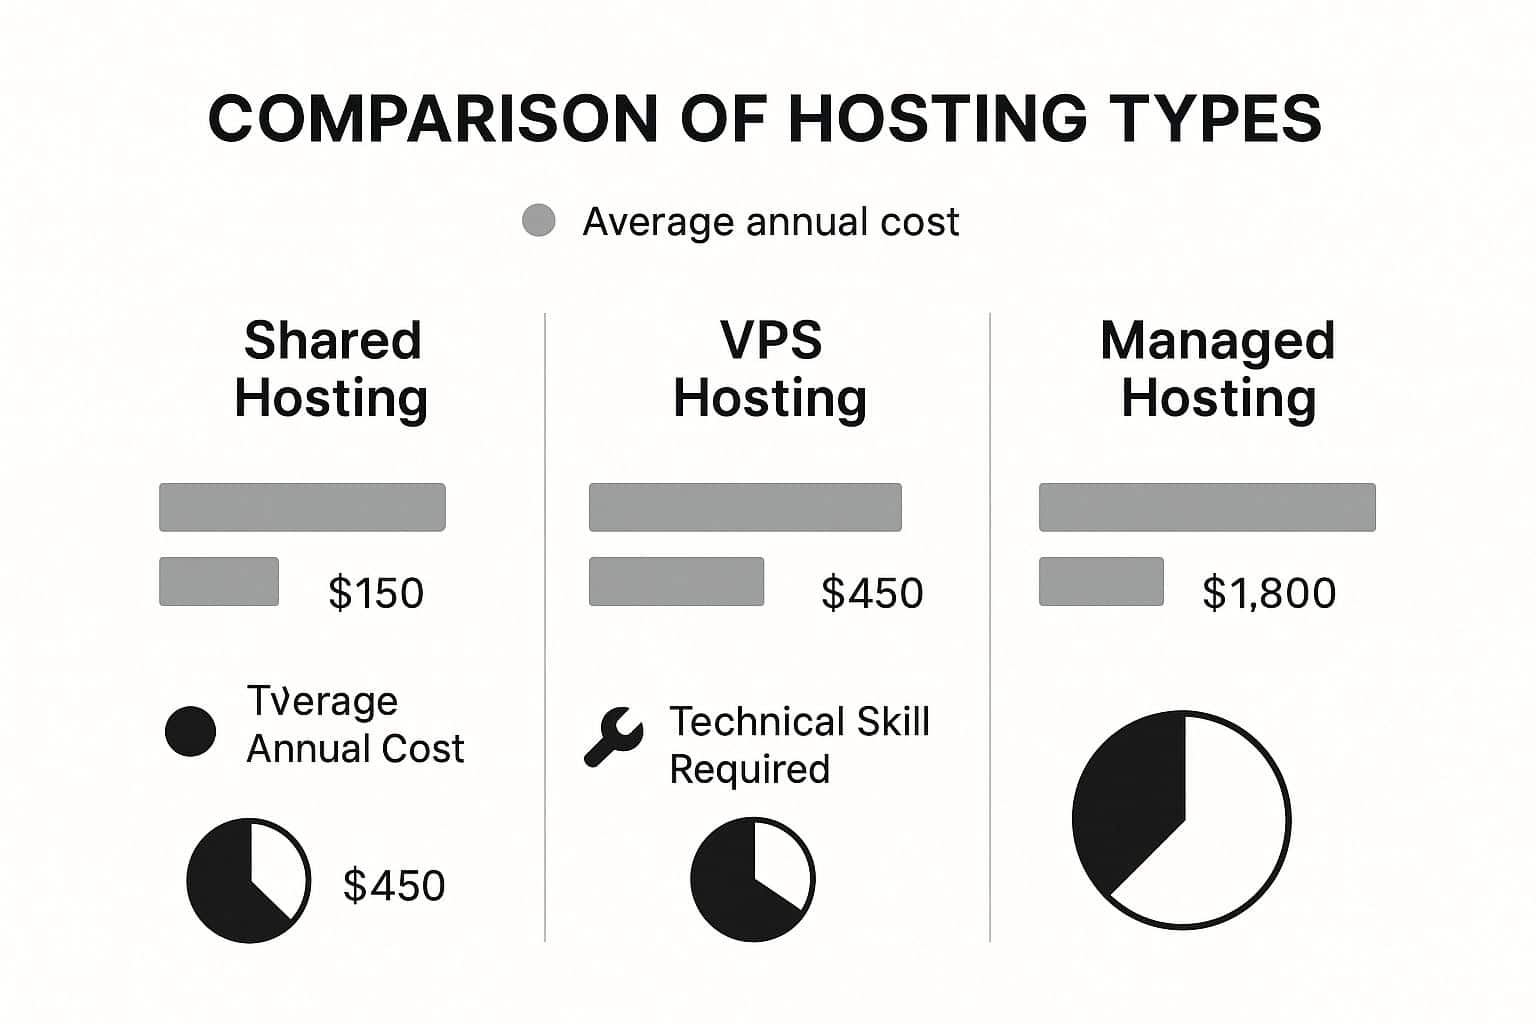
As you can see, spending more on hosting usually means you need less technical know-how. It’s a trade-off between your budget and your time.
- Shared Hosting: This is the go-to for beginners and the most budget-friendly option. It’s like having roommates—you share the server’s resources (like processing power and memory) with other websites. It’s perfect for new blogs, personal portfolios, or small business sites with low traffic. The only downside is that a noisy “neighbor” can sometimes slow you down.
- VPS (Virtual Private Server) Hosting: This is a solid step up, kind of like moving into your own apartment. You’re still in the same building (a physical server) as others, but you have your own private, walled-off space with guaranteed resources. This gives you more power and control, making it a great choice for growing websites that need more muscle.
- Managed WordPress Hosting: This is the premium, hands-off experience. Think of it as a full-service package where the hosting company takes care of all the tricky stuff for you—security scans, daily backups, software updates, and performance tuning. It costs more, but for anyone who wants to just focus on their content and not the technical headaches, it’s a fantastic investment.
Choosing the right host from the start can save you a lot of trouble down the road. If you’re looking for a deeper dive, this guide on the best hosting providers for a WordPress website is a great resource for comparing your options.
Here’s a quick table to help you decide.
Comparing Hosting Options for Beginners
This table simplifies the main differences between the most common hosting types, helping you match a plan to your needs and budget.
| Hosting Type | Best For | Average Cost (Monthly) | Technical Skill Required |
|---|---|---|---|
| Shared | New blogs, personal sites, low-traffic businesses | $2 – $15 | Low |
| VPS | Growing websites, small e-commerce stores | $15 – $80 | Medium |
| Managed WordPress | Serious bloggers, businesses, anyone who wants a hands-off experience | $25 – $150+ | Very Low |
Ultimately, the best choice depends on your confidence, your budget, and how much traffic you expect. You can always start small and upgrade later as your site grows.
Selecting Your Domain Name
Your domain name is your website’s address on the web (ours is TechGeekers.com). It’s how people will remember you and find you online, so it’s a huge piece of your brand. A good domain is easy to remember, simple to type, and gives people a hint about what you do.
Here are a few pro tips for picking a winner:
- Make It Brandable: A unique, catchy name is always better than a generic, keyword-stuffed one. Think about names like
GoogleorEtsy—they’re memorable and have nothing to do with their industry, but they became iconic. - Keep It Short and Simple: The longer and more complex your domain is, the more likely people are to misspell it. Aim for something short and sweet.
- Use a .com Extension: The .com is the gold standard of domain extensions. It’s what most people automatically type in. While others like
.netor.blogexist, always try to grab the .com version first if it’s available. - Avoid Hyphens and Numbers: These just cause confusion. Does that “5” mean the digit or the word “five”? People forget hyphens. It’s best to stick to letters only.
Once you’ve picked your host and registered your domain, you’ve officially laid the groundwork. You now have your own corner of the internet, ready for the fun part: installing WordPress and actually building your website.
Bringing Your WordPress Site to Life
So, you’ve picked out your domain name and lined up a great hosting plan. You’re basically standing on the front porch of your new digital home. The next step is to actually unlock the door and install WordPress. This might sound intimidating, but I promise you, modern hosting has made this part surprisingly easy.
Forget the old days of manually uploading files and messing with databases. Pretty much every good host out there now offers a “one-click” or automated installer for WordPress. That’s what we’ll be using, because it’s built for folks who want to get their site running in minutes, not hours.
The “One-Click” Install: Your Fast Track to a Live Site
Once you log into your hosting account’s control panel (you’ll often see it called cPanel), start looking for a section with software installers. You’re searching for an icon that says “WordPress,” “Softaculous,” or something similar. Go ahead and click it.
This will kick off a simple setup wizard that holds your hand through the whole process.
It’ll just ask for a few key details:
- Choose the Domain: Pick the domain name you just registered from the dropdown list.
- Set Site Details: Give your site a name, like “Jenna’s Travel Blog.” You can always change this later.
- Create Admin Credentials: This part is critical. You’ll create your administrator username and a strong password. This is how you’ll log into the back end of your website, so tuck these details away somewhere safe.
Fill out that short form, hit “Install,” and the system takes over. It handles all the technical grunt work, and within a couple of minutes, you’ll have a fresh, fully working WordPress website. The confirmation screen will give you a link to your new site and, most importantly, the link to your admin login page.
That admin login URL is almost always yourdomain.com/wp-admin. Go bookmark that page right now. It’s your private entrance to your site’s control room.
If you were curious, the official WordPress.org website is where the software itself comes from. The image below shows the actual files your one-click installer is putting in place for you, saving you a huge headache.
This is the core WordPress software package. Thankfully, with a host’s installer, you never have to touch these files directly.
Your First Look at the WordPress Dashboard
When you log in for the first time with the credentials you just created, you’ll land on the WordPress dashboard. This is your command center. It’s the behind-the-scenes area where you’ll write posts, change the design, and manage every single part of your site. It can look a little busy at first, but you’ll get the hang of it fast.
Think of it like the cockpit of an airplane. The main navigation menu runs down the left-hand side, with links to Posts, Pages, Appearance, Plugins, and Settings. The big open space in the middle gives you a quick overview of what’s happening on your site.
Before you dive in and start creating, there are a couple of foundational settings we need to tweak. Getting these right from the start will save you a lot of trouble down the road.
Taking a few minutes to configure these initial settings is like setting up your desk before starting a big project. It ensures everything runs smoothly and prevents common frustrations later on, especially when it comes to search engines finding your site.
Essential First-Time Settings
Find the Settings tab in that left-hand menu. We’re just going to pop into two sections here.
- General Settings: First, click
Settings > General. Make sure your Site Title is correct and add a Tagline. The tagline is just a quick, catchy phrase that sums up your site (e.g., “Exploring the World One City at a Time”). This stuff shows up in browser tabs and Google search results, so it’s your first piece of branding. - Permalink Settings: Next, head over to
Settings > Permalinks. A permalink is the permanent URL for any given page or post. By default, WordPress sometimes uses a clunky, ugly format. We’re going to fix that by choosing the “Post name” option. This gives you clean, readable URLs likeyourdomain.com/my-first-post, which is a huge win for both your visitors and SEO.
And just like that, you’re done with the setup. Your WordPress site is officially installed, configured with smart defaults, and ready for you to make it your own. You’ve built the foundation and you hold the keys. Now for the fun part: deciding what it’s going to look like.
Designing Your Site with Themes and Plugins
Okay, you’ve got WordPress installed. Right now, your website is live but looks pretty bare-bones. This is where the real fun begins—it’s time to give your site a personality and teach it some new tricks with two of the most powerful tools in your toolkit: themes and plugins.
Here’s a simple way to think about it: if your website is a house, the theme is the entire architectural design. It’s the layout, the paint colors, the flooring, and the overall style that makes it feel like your home.
Plugins, on the other hand, are the appliances you install to add new capabilities. Think of them as the security system, the smart thermostat, or the high-end kitchen gadgets that make life easier and your home more functional.
Together, these two elements are what will transform your blank canvas into something unique, beautiful, and powerful.
Choosing Your Website’s Outfit with Themes
A WordPress theme controls the entire visual presentation of your site. It dictates everything from the layout and color scheme to the fonts you use. When you first install WordPress, it comes with a default theme—it’s clean and functional, but you’ll want to swap it out for something that truly represents you or your brand.
You can start browsing for a new look by going to Appearance » Themes in your dashboard and clicking “Add New Theme.” This takes you to the official WordPress theme repository, which is packed with over 7,000 free themes. You can filter, preview, and install any of them with a single click.
A theme does so much more than just make your site look pretty. A well-coded, lightweight theme is the foundation for a fast-loading, user-friendly website. It directly impacts how visitors experience your content and even how search engines rank your site.
The number of choices can feel a bit overwhelming at first, so it helps to understand the two main categories you’ll encounter.
Free vs. Premium Themes
You’ll quickly find there are both free and premium (paid) themes. Both have their place, but it’s important to know what you’re getting.
- Free Themes: These are fantastic when you’re just starting out. They are vetted by the WordPress team, cost nothing, and you can install them right from your dashboard. The trade-off is that they usually have fewer features and customization options, and you won’t get dedicated customer support if you run into trouble.
- Premium Themes: Paid themes, which you buy from third-party marketplaces, typically bring a lot more to the table. They often come loaded with advanced features, extensive design settings, and—most importantly—professional support from the developers. A good premium theme is an investment that can save you a ton of time and give your site a polished, professional look right away.
If you’re weighing your options, checking out curated lists of high-quality WordPress themes is a great way to see what’s possible and find designs that are proven to work well.
Adding Superpowers with Plugins
If themes control how your site looks, plugins control what it can do. Think of plugins as apps for your website. They add new features and functionality that WordPress doesn’t include by default. With over 59,000 free plugins available, you can add just about anything you can imagine without ever touching a line of code.
To get started, head to Plugins » Add New in your dashboard. Just like with themes, you can search the official directory, see reviews, and install what you need in seconds.
The key is to be selective. Start with a few essentials, because installing too many plugins—especially poorly coded ones—can slow your site down.
Essential Plugins Every Beginner Should Install
Think of these plugins as your starter kit. They cover the non-negotiables for running a healthy, secure, and discoverable website.
- An SEO Plugin (Yoast SEO or Rank Math): Search Engine Optimization (SEO) is how people find you on Google. An SEO plugin doesn’t do the work for you, but it acts as a guide, helping you optimize your content with the right titles, descriptions, and keywords to improve your chances of ranking.
- A Security Plugin (Wordfence Security or Sucuri): Website security is not optional. A good security plugin is like a guard at your door—it sets up a firewall, scans for malware, and protects your site from the most common online threats and hacking attempts.
- A Backup Plugin (UpdraftPlus or Duplicator): Imagine losing all your hard work because of a server glitch or a simple mistake. A backup plugin is your safety net. It automatically creates copies of your entire site, so if the worst happens, you can restore it with just a few clicks.
- A Contact Form Plugin (WPForms): You need an easy way for visitors to get in touch. A plugin like WPForms lets you build simple, clean contact forms with a drag-and-drop editor, ensuring you never miss a chance to connect with your audience.
By choosing a great theme and installing these foundational plugins, you’re setting yourself up for success. Your site won’t just look fantastic—it’ll be secure, optimized, and ready for you to start creating.
It’s Time to Create Your First Content
You’ve laid the groundwork—your site’s design is in place and the essential plugins are installed. Now for the fun part: actually adding your voice and ideas to your new website.
In WordPress, everything revolves around creating content. But before you jump in, you need to understand the two main ways WordPress organizes information: Pages and Posts. They might look similar at first glance, but they have very different jobs. Nailing this distinction from day one is the secret to building a website that’s organized and easy for visitors to navigate.
Pages vs. Posts: What’s the Difference?
Think of Pages as the permanent, foundational content of your site. This is the “evergreen” information that rarely changes and typically appears in your main navigation menu.
- About Us: The story of who you are or what your company does.
- Contact: A dedicated spot with your contact details or a form.
- Services: A fixed breakdown of what you offer.
Posts, on the other hand, are for your timely content, like blog articles, news updates, or announcements. They’re typically displayed in reverse chronological order (newest first) and are designed to spark conversation with comments and social sharing.
Here’s an easy way to think about it: Pages are the core chapters of a book (like the Introduction and Table of Contents), while Posts are the individual entries you write in a journal over time. One builds the structure, the other tells the ongoing story.
For this guide, we’re going to focus on writing your very first blog post, since that’s where most of the content creation magic happens.
Getting to Know the Block Editor
When you go to Posts » Add New Post from your dashboard, you’ll meet the modern WordPress editor. It’s often called the Gutenberg or Block Editor, and it works a lot like playing with digital LEGOs.
Instead of a single, giant text field, your entire article is built piece by piece using individual “blocks.” A paragraph is a block. An image is a block. A heading, a quote, a video—they’re all separate blocks. This modular approach gives you amazing control over your page layout without ever touching a line of code.
You’ll find yourself using these fundamental blocks all the time:
- Paragraph Block: Your go-to for all standard text.
- Heading Block: Perfect for creating section titles (like H2s and H3s) that break up your content and make it easier to read.
- Image Block: Lets you quickly upload a new picture or grab one you’ve already added to your Media Library.
- List Block: Easily creates bulleted or numbered lists.
Adding a new block is a snap. Just click the little + icon and search for what you need or browse through the options. It’s a clean, visual, and surprisingly powerful way to build beautiful articles.
Step-by-Step: Publishing Your First Post
Alright, let’s walk through creating a blog post from start to finish. This whole process will feel like second nature in no time.
- Give It a Title: The first thing you’ll see is a prompt to “Add title.” This is your headline! Make it catchy and descriptive, as it’s the first thing your readers (and search engines) will see.
- Start Writing with Blocks: Just click below the title and start typing. Your first block will automatically be a paragraph. Want to add an image next? Click the
+button, find the Image block, and pop it in. - Add Your Media: When you use an Image or Video block, you can upload a file directly, pick from your Media Library, or even embed from a URL. Once it’s in, you can easily add alt text (a must for accessibility and SEO) and resize it right there in the editor.
- Get Organized with Categories and Tags: Before you hit publish, take a look at the settings sidebar on the right. You’ll find two key organizational tools: Categories and Tags.
- Categories are for the broad topics on your blog. Think of them as the main sections of a bookstore, like “Marketing,” “Recipes,” or “Travel Guides.” A post usually belongs in just one or two categories.
- Tags get more specific. They’re like the index keywords at the back of a book. For a post in the “Travel Guides” category, your tags might be “Paris,” “Eiffel Tower,” or “foodie.” Use as many as you need to help people find your content.
- Preview, Then Publish: This is a crucial final step. Always hit the Preview button in the top-right corner to see exactly how your post will look to the public. If everything looks good, go ahead and click that big blue Publish button. WordPress will ask you to confirm, and with one more click, your first piece of content is live for the world to see.
And that’s it! You’ve officially gone from building a website to being a content creator. With these fundamentals down, you’re ready to start filling your site with your own unique ideas and stories.
Keeping Your Website Safe and Healthy
Getting your WordPress site live is a fantastic feeling, but the real work has just begun. Think of your website like a new car—it needs regular tune-ups to keep running well. This ongoing care is what keeps your site secure, fast, and healthy for years to come.
Without these simple habits, you’re leaving your hard work vulnerable to common threats and performance dips. It’s one of the biggest mistakes new site owners make, but we’ll make sure you get started on the right foot.
The Importance of Regular Updates
The single most important maintenance task you can do is keeping everything updated. The WordPress core software, plus all your themes and plugins, get regular updates from their developers. These aren’t just for shiny new features; they often contain critical security patches that close up vulnerabilities.
An outdated plugin or theme is the number one way hackers break into a WordPress site. Treating updates as optional is like leaving your front door wide open—it’s just asking for trouble. Staying current is your first and best line of defense.
So, when you see that little update notification in your dashboard, don’t ignore it. It’s a simple one-click process that literally takes seconds but offers massive protection.
Creating a Non-Negotiable Backup Plan
Picture this: a server glitch or a simple human error suddenly erases all of your content. If you don’t have a backup, it’s gone. For good. This is exactly why a solid backup plan isn’t just a nice-to-have; it’s non-negotiable. It’s your digital insurance policy.
The good news is you don’t have to handle this manually. There are fantastic plugins that can automate the whole thing for you.
- Schedule Automated Backups: Install a trusted plugin like UpdraftPlus and set it to automatically back up your site daily or weekly. This should include all your files and the database.
- Store Backups Off-Site: Never save your backups only on your server. Connect your backup plugin to an off-site storage location like Google Drive or Dropbox.
This whole process takes less than 15 minutes to set up and buys you complete peace of mind.
A couple of other quick wins will go a long way, too. Always use strong, unique passwords for your admin login—no exceptions. You can also add a powerful layer of security with a plugin like Wordfence, which gives you a firewall and malware scanner. These simple, consistent actions are what will keep your WordPress site safe and performing beautifully.
Got Questions About WordPress? Let’s Get Them Answered.
If you’re just starting out with WordPress, you probably have a few questions buzzing around. That’s completely normal. Getting these sorted out early on will make the whole process feel less intimidating and a lot more manageable. Let’s clear up some of the most common things new users ask.
Right off the bat, many people get tripped up by the two “flavors” of WordPress. It’s an easy mistake to make, but picking the right one from the start is crucial.
What’s the Deal with WordPress.com vs. WordPress.org?
I like to explain this with a simple analogy: think of it as renting an apartment versus owning your own house.
WordPress.com is like renting. It’s a for-profit company that uses the WordPress software to provide you with a website builder and hosting service. It’s easy to get started, but you’re limited by the landlord’s rules—fewer design choices, restrictions on plugins, and limits on how you can earn money.
WordPress.org, on the other hand, is like owning a home. This is the free, open-source software you can download and install on your own web hosting. You have 100% control over everything—every theme, every plugin, every line of code. It’s true ownership.
Another big question that comes up is about the cost. Is it really free?
The WordPress software itself is completely free to download and use. Always has been, always will be. But to get a website online for the world to see, there are a couple of necessary costs you can’t avoid.
Can I Really Build a WordPress Site for Free?
Yes and no. The core software is free, but a website needs two things to exist online: a domain name (your address, like yourwebsite.com) and web hosting (the plot of land where your site “lives”).
- A domain name will typically run you about $10–20 per year.
- Basic web hosting can start as low as $3–10 per month.
So while WordPress is free, these two small investments are essential to launching a self-hosted site.
Finally, a lot of beginners worry they need to be a coding wizard to use WordPress.
Is WordPress Too Hard for a Beginner to Learn?
Absolutely not. In fact, its ease of use is one of the main reasons it’s so popular. The dashboard is designed to be intuitive, and the modern Block Editor makes creating pages feel just like using a simple document editor. You just add blocks for text, images, and videos.
Can it get complex? Sure, if you want to dive into advanced custom development. But for building and managing a beautiful, professional website, you don’t need to touch a single line of code.
Here at Tech Geekers, our goal is to give you clear, practical advice that actually helps you build something great. For more walkthroughs and tips, check out our other guides at https://techgeekers.com.