How to Backup iPhone in Recovery Mode?
Apple is the epitome of luxury and each year it brings out expensive phones that are beautiful and user-friendly. Unfortunately, the biggest assets of this firm being user-friendly and having an intuitive interface also translate to one of their biggest flaws.
What is that, you ask?
That an Apple device does not allow a very great degree of personalization, unlike Android phones. To Backup iPhone in recovery mode is one of the biggest problems that most iPhone users face.
I personally have faced this problem where I have lost a lot of data to an untimely sync. After losing all my recent vacation pictures I decided it was time to look for a solution. Once again, I turned to dr.fone since it had proved to be quite useful for my previous endeavors. I found the answer to my prayers in Repair (iOS System Recovery).
Important Note:
Before booting Repair (iOS System Recovery), you are to download the latest version of iTunes. This is very important and needs to be done before dr.fone is run. To avoid iTunes from automatically syncing, do avoid launching iTunes before dr.fone. Disable your automatic syncing by:
- Launching iTunes
- Go to Preferences
- Then click on Devices and check “Prevent iPods, iPhones, and iPads from syncing automatically”
Step 1: Connect Device to Computer
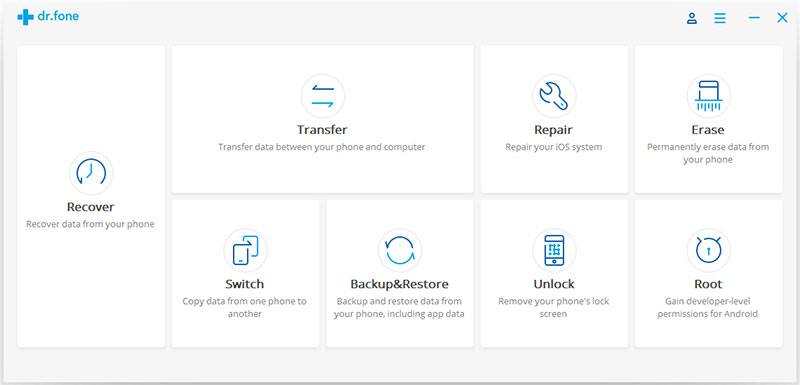
On connecting your iPhone to the computer to backup iPhone in recovery mode, you will see this screen. Choose “Recover” to begin the process of recovering data.

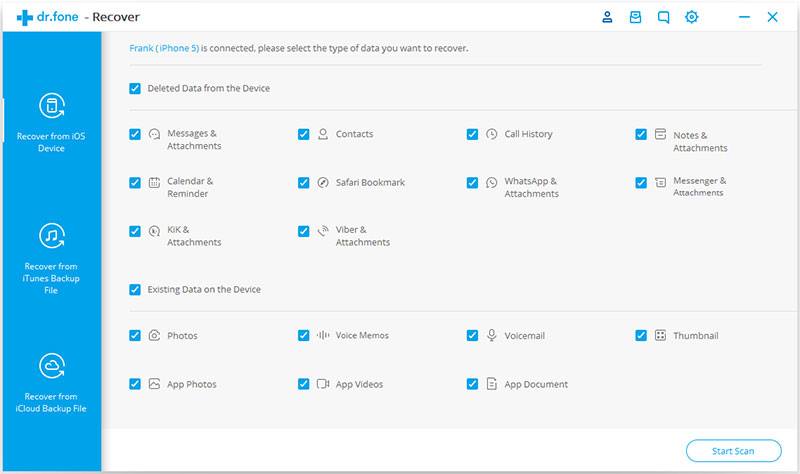
Once dr.fone recognizes your device, it will show you the following window:

Also View Best iPhone Wallpapers in HD download and save for free on computer
Step 2: Scan Your Device for Data to Recover Data
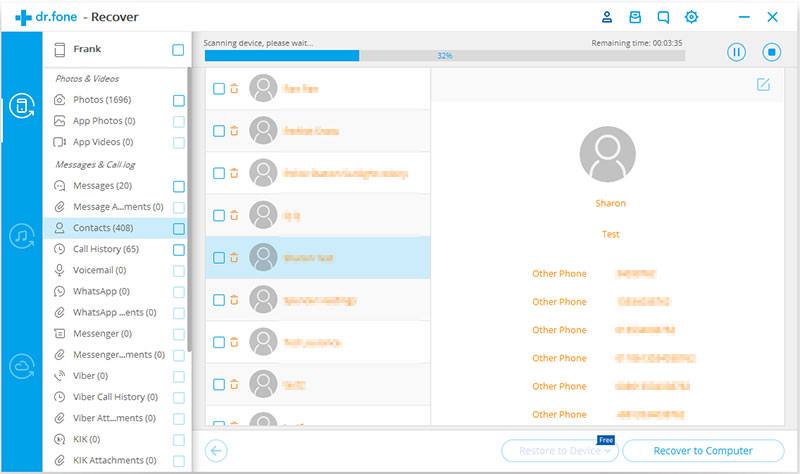
On clicking “Start Scan” on the previous screen you will be taken to this one that will show all the data that has been deleted or lost. This will take quite a while if you have large volumes of lost data, in case you find the data you are looking for before the completion of the scan, do click “Pause” it in its tracks.

Step 3: Review and Finally Backup iPhone in Recovery Mode
On completion/pause, a result is generated. Data lost and existing on your device are both displayed in different categories. You can choose to view only your deleted items by swiping the option “Only display deleted items” to “On”. The search bar is extremely responsive and can display specific files on being searched by name. There is a preview option too, to ensure that you’ve found the correct file.
Then simply save the data to your computer by clicking the “Recover to Computer” button.

The default save option is to your computer but a pop-up will also appear to ask you if you wish to recover to your device instead.
And it’s as simple as that! This is a very simple and quick way to backup iPhone in recovery mode. It gives you a large volume of legacy data to access which you might have otherwise lost if left to your own devices.
I have used this program to recover my iPhone data even when it just displayed the white Apple logo/Apple of Death. It was a savior and I just thought that I should share information like this with fellow iOS users. If you have any programs that can do the same job, do comment below so that I can use it when my iPhone dies again, which it is sure to!


